Custom Scenery Exchange / Need Walls
-
 13-June 16
-
 SlayMeGaga
Offline
SlayMeGaga
Offline
Hey guys! Would one of you guys be able to make these movie posters into full size wall objects for my Paramount Park? I would greatly appreciate it and give you full credit when the park is release (which is half way done).
Here are the posters.
 5210.jpg (184.9KB)
downloads: 8
The-Hunt-for-Red-October-poster-_slika_O_9829005.jpg (164.45KB)
downloads: 8
Mission-Impossible-2-Ethan-Hunt-Tom-Cruise-2000-Poster.jpg (824.76KB)
downloads: 3
Deep-Impact-movie-poster.jpg (273.78KB)
downloads: 4
MPW-19512.jpg (50.18KB)
downloads: 4
The-Italian-Job-Poster.jpg (83.16KB)
downloads: 2
faceoff-face-off.457.jpg (208.52KB)
downloads: 1
titanic_ver2_xlg.jpg (320.1KB)
downloads: 1
659b64dc43.jpg (265.27KB)
downloads: 1
Raiders-of-the-Lost-Ark-poster-2.jpg (648.43KB)
downloads: 1
topgun.jpg (626.17KB)
downloads: 1
star-trek-nemesis-5213001147094.jpg (479.2KB)
downloads: 1
10-Cloverfield-Lane-Poster.jpg (127.4KB)
downloads: 2 Screen Shot 2016-06-13 at 12.45.06 PM.png (2.06MB)
downloads: 3 -
SlayMeGaga
Offline
If none of y'all are going to help me out, then someone at least make a good tutorial on how to make a custom wall or something. The most recent tutorial we have now on how to make custom objects is literally like 4 years old and half the text in it is pointless. I'm pretty sure if someone did make a new tutorial, then half of us wouldn't asked every week on how to make a custom object for ourselves.
-
 Liampie
Offline
I don't have time to make objects or tutorials right now, but it should be fairly simple. Experiment with copy+pasting images into the object editor, right click on the image and it should say something like 'skew' or something like that. Thats how you get stuff in isometric perspective. That's what I'd try first.
Liampie
Offline
I don't have time to make objects or tutorials right now, but it should be fairly simple. Experiment with copy+pasting images into the object editor, right click on the image and it should say something like 'skew' or something like that. Thats how you get stuff in isometric perspective. That's what I'd try first. -
 X7123M3-256
Offline
X7123M3-256
Offline
When do you need this by? I might be able to do this in a couple of weeks, if that's not too late, but I can't guarantee anything. I have yet to actually create a scenery object, though I now have almost everything I need to do it. I have implemented an encoder for wall objects and my renderer is already capable of mapping an image onto a polygon, so I just need to tie the two together.
-
SlayMeGaga
Offline
^ It's not too late! I don't really have a date, just I would like to them before the end of my summer since I plan on releasing in August at least. Just not be able to create these pieces to finish up the biggest area in my park is just bugging me haha. That Paramount logo I made was by pure luck, I forget how I made it tbh. Anyway it would be amazing if did create these for me, but I understand you're a busy person and stuff.
-
 CHE
Offline
CHE
Offline
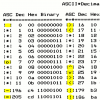
Load your image into any picture editor and resize the width to 32 pixels. Change top left pixel to a color unused in the picture as everything with this color will be transparent later. Save as .bmp.
Open RCTobjectEditor (you find it here).
Click new>wall/fence>ok.
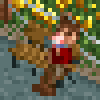
Click the folder symbol that has "BMP" written under it. Open your picture file. Click "SW".
Repaint the lost top left pixel. Right click on the image in the editor and "skew right". Move to the very left side with the arrows under the image. Move up/down so the lowest pixels cover both lines on the grass (click + for zoomed in view).
Do the same again, just click "NW" when you open the picture file and "skew left" and move completely to the right.
Set the clearance to something like 5 (you can click the base-and-top-outline symbol to see if it fits). Set building cost to whatever you think would be a fair price.
Click the hand-with-pen symbol. Enter description for one language. A copy-to-all-languages-function is under the "Edit" tab. (This is the most important step. Nobody likes undescribed objects.)
Click the save symbol. Name your object like "MOVPOS01.dat".
Open RCT2. Enjoy. Hope I didn't forget anything.

Tags
- No Tags